Spring启动器
- SpringBoot工程可以在main方法中执行SpringApplication.run()这种方式来启动。
@SpringBootApplication
public class Application {

    public static void main(String[] args) {
        SpringApplication.run(Application.class, args);
    }

}
- 如果我们需要在SpringBoot启动过程中添加一些定制代码(如定制启动Banner,设置自定义监听器等,设置启动拓展,设置启动环境变量),这种方式就无法满足我们的要求了。
- 比如我们现在要定制启动Banner,那么有如下两种方式。
@SpringBootApplication
public class Application {
    public static void main(String[] args) {
        SpringApplication application = new SpringApplication(Application.class);
        application.setBannerMode(Banner.Mode.OFF);
        application.run(args);
    }
}
@SpringBootApplication
public class Application {
    public static void main(String[] args) {
        new SpringApplicationBuilder()
                .sources(Application.class)
                .bannerMode(Banner.Mode.OFF)
                .run(args);
    }
}
- 只是定制一个banner,代码就得如此,并不是很优雅,倘若我们有很多个微服务,那每个微服务都这么写,代码必定会显得很冗余。
- 所以我们需要有一个优雅的解决方案,使得每个微服务都调用自定义的启动器,这样最终呈现效果就能如原生一样简洁优雅。
自定义启动器
- 核心思路是采用
SpringApplicationBuilder,将其封装进一个核心类中进行拓展,以便于微服务启动之用。 - 启动器核心代码如下
public class BladeApplication {
public static ConfigurableApplicationContext run(String appName, Class source, String... args) {
SpringApplicationBuilder builder = createSpringApplicationBuilder(appName, source, args);
return builder.run(args);
}
private static SpringApplicationBuilder createSpringApplicationBuilder(String appName, Class source, String... args) {
Assert.hasText(appName, "[appName]服务名不能为空");
ConfigurableEnvironment environment = new StandardEnvironment();
MutablePropertySources propertySources = environment.getPropertySources();
propertySources.addFirst(new SimpleCommandLinePropertySource(args));
propertySources.addLast(new MapPropertySource(StandardEnvironment.SYSTEM_PROPERTIES_PROPERTY_SOURCE_NAME, environment.getSystemProperties()));
propertySources.addLast(new SystemEnvironmentPropertySource(StandardEnvironment.SYSTEM_ENVIRONMENT_PROPERTY_SOURCE_NAME, environment.getSystemEnvironment()));
String[] activeProfiles = environment.getActiveProfiles();
List<String> profiles = Arrays.asList(activeProfiles);
List<String> presetProfiles = new ArrayList<>(Arrays.asList(AppConstant.DEV_CDOE, AppConstant.TEST_CODE, AppConstant.PROD_CODE));
presetProfiles.retainAll(profiles);
List<String> activeProfileList = new ArrayList<>(profiles);
Function<Object[], String> joinFun = StringUtils::arrayToCommaDelimitedString;
SpringApplicationBuilder builder = new SpringApplicationBuilder(source);
String profile;
if (activeProfileList.isEmpty()) {
profile = AppConstant.DEV_CDOE;
activeProfileList.add(profile);
builder.profiles(profile);
} else if (activeProfileList.size() == 1) {
profile = activeProfileList.get(0);
} else {
throw new RuntimeException("同时存在环境变量:[" + StringUtils.arrayToCommaDelimitedString(activeProfiles) + "]");
}
String startJarPath = BladeApplication.class.getResource("/").getPath().split("!")[0];
String activePros = joinFun.apply(activeProfileList.toArray());
System.out.println(String.format("----启动中,读取到的环境变量:[%s],jar地址:[%s]----", activePros, startJarPath));
Properties props = System.getProperties();
props.setProperty("spring.application.name", appName);
props.setProperty("spring.profiles.active", profile);
props.setProperty("info.version", AppConstant.APPLICATION_VERSION);
props.setProperty("info.desc", appName);
props.setProperty("blade.env", profile);
props.setProperty("blade.name", appName);
props.setProperty("blade.is-local", String.valueOf(isLocalDev()));
props.setProperty("blade.dev-mode", profile.equals(AppConstant.PROD_CODE) ? "false" : "true");
props.setProperty("blade.service.version", AppConstant.APPLICATION_VERSION);
props.setProperty("spring.cloud.consul.host", ConsulConstant.CONSUL_HOST);
props.setProperty("spring.cloud.consul.port", ConsulConstant.CONSUL_PORT);
props.setProperty("spring.cloud.consul.config.format", ConsulConstant.CONSUL_CONFIG_FORMAT);
props.setProperty("spring.cloud.consul.watch.delay", ConsulConstant.CONSUL_WATCH_DELAY);
props.setProperty("spring.cloud.consul.watch.enabled", ConsulConstant.CONSUL_WATCH_ENABLED);
ServiceLoader<LauncherService> loader = ServiceLoader.load(LauncherService.class);
loader.forEach(launcherService -> launcherService.launcher(builder, appName, profile));
return builder;
}
private static boolean isLocalDev() {
String osName = System.getProperty("os.name");
return StringUtils.hasText(osName) && !(AppConstant.OS_NAME_LINUX.equals(osName.toUpperCase()));
}
}
如何使用
- 以我们之前做的
blade-demo模块启动为例,看下代码
@SpringCloudApplication
@EnableFeignClients(AppConstant.BASE_PACKAGES)
public class DemoApplication {
public static void main(String[] args) {
BladeApplication.run(CommonConstant.APPLICATION_DEMO_NAME, DemoApplication.class, args);
}
}
- 可以看到非常简约,与原生并没有太多变化,只是多了一个appName的参数,此参数正是做为服务名注册到注册中心,用于和其他服务分类。
注意点
- 自定义启动器已经将环境变量也设置好,无需再到
application.yml中配置spring.profiles.active再打包。 - 打包后的app启动时,若不设置
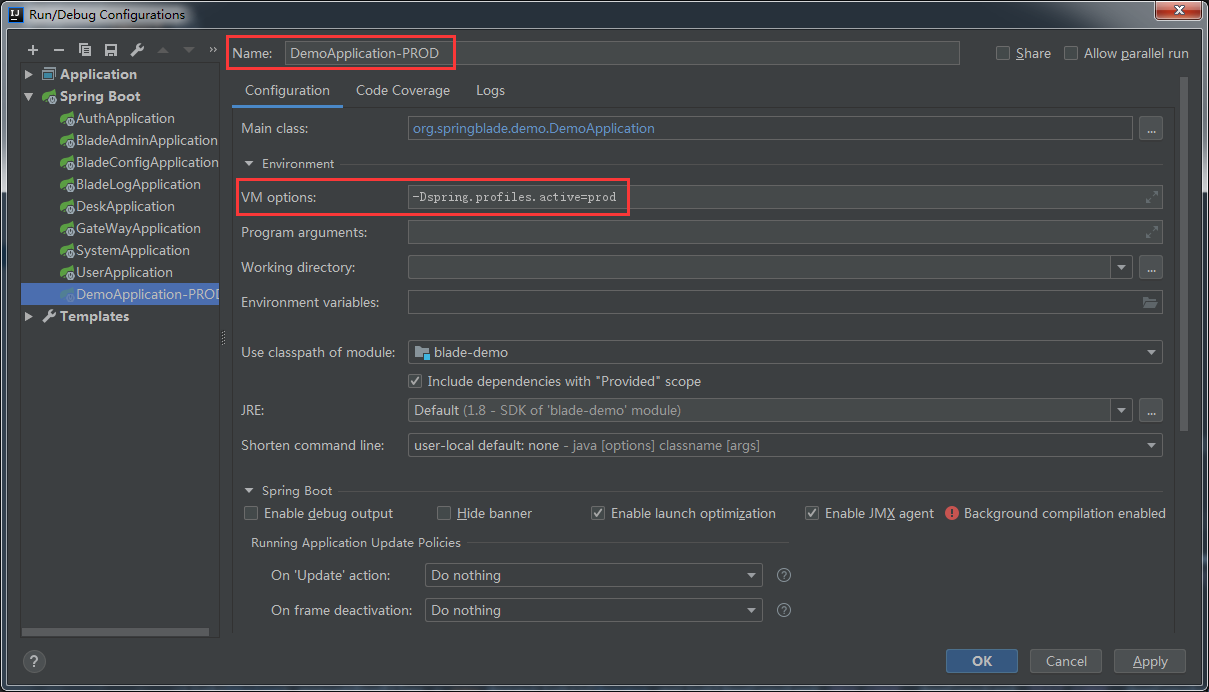
spring.profiles.active,则默认为dev,如需设置只需在启动的命令行加上即可。
java -jar app.jar --spring.profiles.active=prod --server.port=2333 - 无论是打包了fat-jar,还是打包了docker,都只需要打包一次,搭配上注册中心就可以运行在任何设定好的环境中,这样一来就实现了
一次打包,处处运行的理念。 - 开发中,如果要修改为非
DEV环境,可参考如下配置。


